Foundation Repair Costs

If your foundation is sagging, it can cause problems throughout your house. During a foundation repair, supports are installed beneath the home to return it to its original elevation. This will close cracks, re-align doors, and help the entire home function properly.

Foundation Repair

Learn more about the different repair methods, costs, and warning signs. Recognizing these early signals will help prevent future damage and costly repairs. For professional help, contact Plano Foundation Repair.

Foundation damage can be costly to repair and may threaten the structural integrity of a home or building. Recognizing the signs of foundation problems and taking action to ensure repairs are made in a timely manner can help protect the value of a property and the safety of its occupants.

Cracks in walls, floors, and ceilings are the most common sign of foundation settlement. These cracks can vary in size and direction and are a result of varying stresses on the foundation. For example, vertical cracks typically indicate normal settling while horizontal cracks may be caused by soil movement or hydrostatic pressure.

Another telltale sign of a shifting foundation is gaps around doors and windows. As the foundation shifts, the frame of a house or building can distort and cause doors and windows to no longer fit properly or latch correctly. Gaps around these openings can also allow water and pests to enter the structure, which can lead to further damage and increased costs for repairs.

Uneven floors are another indicator of foundation problems. When areas of a floor feel lower than other parts of the same level, this is a sign of a shifting foundation that requires immediate attention to prevent further damage and protect the safety of occupants. In addition, sagging floors may be caused by soil erosion or inadequate drainage systems, and can create tripping hazards for visitors and increase the risk of mold and mildew growth.

Bowing and buckling walls are also serious signs of foundation problems. These buckling walls usually indicate significant pressure on the foundation walls from soil movement or hydrostatic pressure, and can compromise the structural integrity of the building. The installation of wall anchors or carbon fiber straps is often needed to stabilize these walls and prevent further movement.

Sagging and uneven floors, sticking doors and windows, and gaps in walls are all signs of foundation issues that need to be addressed as soon as possible. These problems are often exacerbated by moisture and require prompt attention to avoid more extensive damage, potential safety risks, and high repair costs.

Causes

The foundation of any building supports everything else – walls, floors, doors and windows. When it is damaged, the entire structure of the building is at risk and can cause major issues. If not addressed promptly and effectively, the damage can lead to unsafe living conditions.

Various causes can contribute to foundation damage. These include poor drainage, which can cause soil expansion and affect the stability of the foundation. Thermal expansion, changes in temperature that cause concrete to expand and contract can also impact the stability of the foundation. Poor construction practices and the use of inferior materials can also contribute to structural failures.

Signs of foundation damage can include cracks in walls, floors and around doors and windows. Stair-step cracks in brick walls and gaps in exterior brick are indicative of shifting or settlement of the foundation. Doors and windows that no longer open or close properly may also indicate a foundation problem. Uneven floors that slope or feel spongy are another indication of foundation problems.

Water leaks are a serious concern, as they can cause widespread damage to the foundation and the building itself. It is important to address water leaks immediately to prevent more severe damage and costly repairs in the future.

Severe and widespread damage to the foundation may require replacement to ensure the structural integrity of the building. This is especially true if there are cracks and displacement in key areas of the foundation, including the sill plates that support the beams of the building.

Regularly inspect the outside of your home for signs of foundation damage. Make sure that there are no leaks from gutters, downspouts or water-saturated soil. Make sure that there is adequate drainage and that the landscaping slopes away from the foundation. Keep an eye out for signs of tree roots that extend under the foundation. Ensure that the soil under and surrounding the foundation is well-compacted and free of debris. If you suspect a problem, contact an engineer for professional assessment and recommendations. Engineer-recommended solutions are designed to offer long-term stabilization and are tailored to the unique conditions of each foundation.

Repair Options

There are many different ways to repair your foundation. Some methods are more expensive than others, but they all have one thing in common: they can protect the long-term value of your home.

The type of damage your home is experiencing will determine the best solution. Cracks in walls and floors may suggest settling or sinking, while bowing walls can indicate a structural problem. Moisture intrusion and soil pressure are also common causes of foundation damage. If left untreated, these issues can exacerbate damage to your home’s structure and interior finishes.

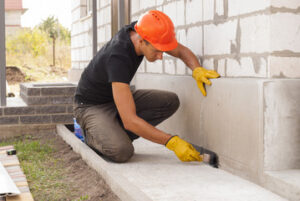
Once a professional has assessed the damage, they can recommend a specific repair method. Choosing the right solution will help prevent further problems and keep your home safe for your family.

Most foundation repair methods involve removing dirt from the area around your home to provide a stable base. This can take a few days, but it will allow contractors to access areas of your home that might otherwise be inaccessible.

During the repair process, your contractor will patch cracks in your foundation walls. This will stop water from seeping into your basement or other rooms and causing further damage. It can also prevent moisture and soil from entering your home’s basement or crawl space, where it could cause further damage.

If your home’s concrete slab has shifted or sunken, a technique called “slabjacking” can be used to raise the slab back to its original position. This repair method is quicker and less disruptive than other repairs, such as complete slab replacement.

Another repair option is underpinning, which involves installing steel pilings below your foundation to support it from underneath. This is a more invasive repair, but it’s also the most effective in terms of stabilizing your foundation and preventing further damage.

When the time comes to choose a repair method, be sure to consider the benefits of each and weigh your options carefully. Remember, the longer you wait to address your foundation problems, the more costly and extensive the repairs will be. While foundation problems can be scary, knowledge is your greatest ally in this fight!

Cost

The cost of foundation repair can vary widely depending on the scope of work required and the cause of the damage. Understanding some of the factors that influence price helps homeowners anticipate expenses and plan accordingly. These include the size of the home, soil conditions, labor and materials costs, and geographical location. In addition, inspection fees and permit charges might be required to meet local building standards, adding to the overall cost of the project.

Regardless of the extent of damage, prompt repairs can save homeowners from costly structural issues down the road. Uneven floors, sticking doors, or damp basements might seem like minor annoyances at first but can lead to significant problems such as mold growth and musty odors if left unattended. Choosing a reputable contractor, ensuring that proper drainage systems are in place, and regularly performing maintenance can help mitigate these risks.

There are a number of different repair options, including slabjacking, underpinning, and bell-bottom piers. Each method has its own benefits and considerations, but they all aim to restore a home to its original elevation. This prevents further damage, closes cracks, and re-aligns doors and windows, so they work as they were originally intended to do.

Another factor that impacts the cost of foundation repairs is the quality of materials used. While utilizing the lowest-cost materials might save up front, they may not last as long or perform as well as high-quality products. As a result, it is often worth paying a little more for a longer-lasting solution that will reduce the need for future repairs.

The cost of foundation repair can add up quickly, but a little planning and preparation can help homeowners manage these expenses more effectively. By getting multiple quotes, scheduling repairs during off-peak times, and utilizing the right maintenance measures, homeowners can minimize their expenses without compromising on quality. The key is to take a proactive approach to your home’s foundation health and stay up-to-date on the latest repair methods and techniques. Doing so can keep your home safe and healthy for years to come.

Garage Door Safety Features

Your Avondale Garage Door is a major structural component of your home. It is also a significant visual feature that can boost curb appeal and complement your architecture.

Garage Door

Traditional steel garage doors are the most popular. They are low-maintenance and come in a variety of colors and styles with tons of window options.

Garage door openers are motorized devices that open and close the garage doors at the push of a button. These devices come equipped with safety features like automatic reversal mechanisms and sensors to ensure your family and home are protected from injury and damage. While these systems are designed to reduce the risk of accidents, they can sometimes experience problems that may require professional assistance.

Safety sensors work by sending a signal to the garage door opener when an obstruction is detected in their path while closing. This safety feature is required by UL 325 standards and helps prevent accidents that could otherwise injure people or pets that get caught under the moving garage door. This technology also minimizes damage to the garage door itself that would otherwise occur if it were to run into a solid object.

Most residential garage doors use photo eye sensors, while commercial models typically incorporate edge and door edge sensors. These sensors can detect an object or person in their path by emitting and detecting invisible beams of light. If the beam is interrupted, or if an object is placed between the sensors, the garage door will immediately reverse its direction.

Regular inspections by InterNACHI-certified professionals help to keep garage doors functioning properly. These inspections can include a check of the manual safety release handle, which should always be easily accessible and positioned high enough to prevent children from reaching it. It’s also important to teach your family members proper lifting techniques and to regularly test the automatic reversal mechanism.

The reversal test can be conducted by placing an object (like a 2 x 4 laid flat) in the center of the track where the garage door closes. If the garage door comes into contact with the object and fails to automatically reverse its direction, this indicates it is out of alignment or needs a sensor adjustment by a qualified technician.

Depending on the model, your garage door may also have adjustable force settings that determine how much pressure is exerted when the automatic reversal system is activated. These force settings can be adjusted with the dial on the garage door opener, and they should be kept at a level that will not cause the system to engage even if there is an obstruction in its path.

Force Settings

If your garage door stops halfway through an opening or closing cycle or reversing before reaching its fully open or closed position, it may indicate that the force settings on your opener need to be adjusted. These controls regulate the amount of power that is applied to the door, providing safety and ensuring that the doors don’t hit the floor or ceiling during operation.

The force settings are made up of an up and down travel limit as well as a force adjustment screw. While higher settings can increase door speed, they also make the opener more susceptible to damage from debris and other obstructions. To reset the force settings, follow the manufacturer’s instructions in your owner’s manual. Start by adjusting the up travel limit to a medium level and retest the door after each adjustment. Once the up travel limit has been set, turn the down force adjustment screw clockwise to increase the down force. Repeat the process to adjust the up and down forces to their desired levels.

Occasionally, a garage door may stop operating properly because of sensor or motor problems. In such cases, a technician should be called in to diagnose and repair the problem. DIY attempts at limit resets can cause electrical damage, void warranties, and lead to recurring problems in the future.

In addition to adjusting the opener’s limits, homeowners should regularly inspect and maintain their garage doors. The safety sensors should be correctly aligned and free of obstructions, and the rollers, hinges, and tracks should be properly lubricated. The sensor lenses should be cleaned regularly to remove dust and debris that could obstruct the sensors’ line of sight.

A common reason for a garage door to malfunction is that the springs are unbalanced. A professional can perform a comprehensive test to determine the status of the springs and provide an accurate estimate of how much weight should be on each side of the door. Unbalanced springs can cause the garage door to stop midway through its opening or closing movements, as it cannot transition smoothly from a vertical standing position to a horizontal lying position.

Safety Sensors

The safety sensors are a smart addition to any garage door system. They are designed to prevent the door from closing if there is an obstruction in its path, protecting children and pets from being trapped. They operate by transforming electricity into an invisible infrared beam of light. This beam is transmitted by a transmitter sensor to a receiver sensor that sits directly across from the transmitter. When the beam is interrupted, a signal is sent to the garage door opener, which then reverses the direction of travel. This feature significantly reduces the risk of entrapment and injury.

The sensors are easy to install and operate. Simply place one of them on either side of the garage door opening, and ensure they are positioned at a height of 6 inches off the ground. They should have a yellow light on the transmitter, and a green light on the receiver, to indicate that they are properly aligned and communicating with each other. Once the lights are on, a test can be performed. Put an object, such as a box, in the sensor’s line of sight. If the sensor is activated, it should immediately reverse the direction of travel to avoid damage or harm.

Like other components of the garage door, it is important to perform regular maintenance on the safety sensors to ensure they continue to function effectively. Keeping the sensors clean is an essential part of this maintenance. Dirty lenses can block the infrared light that is transmitted by the transmitter, causing the sensor to malfunction. This can be easily remedied by wiping the lens with a soft cloth, or by using a mild cleaner that won’t leave streaks on the glass. Other common causes of malfunctioning sensors include misalignment and pinched wires. A garage door professional can help you troubleshoot any issues with your safety sensors and restore their functionality.

Security

The garage is a valuable entry point to your home and a storage space for all kinds of tools, sports equipment and vehicles. Keeping this area secure is important for family safety and property protection. This is why modern garage doors include a range of security features designed to make your home more resistant to break-ins.

The most critical component of your garage door’s safety is a set of sensors that detect objects and prevent the closing of the garage door on them. These are mounted on either side of the garage door near the floor and housed in small black boxes with a light. To keep these sensors in good working condition, you should check them regularly for misalignment or damage. In the event that a sensor is displaced from its normal position, you can manually reset it by pressing the emergency release cord.

You can also install motion detection lights that automatically turn on at night and illuminate your garage area when movement is detected. This visual deterrent is a powerful deterrent that can significantly reduce the likelihood of burglaries and other security breaches.

Another simple, but effective, way to enhance your garage’s security is to add a lock on the service door that connects the garage to your house. While it may be a little inconvenient to use, you’ll appreciate having the added layer of security if your home is targeted for break-ins.

If you want to further boost your garage’s security, consider installing smart security cameras both inside and outside of your garage that can be accessed via your smartphone. These are especially useful if you’re a frequent traveler and need to monitor your home while away for long periods of time.

It’s always a good idea to change the access code on your garage door opener periodically, as this will prevent unauthorized users from gaining access to your home. It’s also a good idea to keep your garage door remote locked in a safe place at all times, so it doesn’t fall into the hands of someone who might use it to break into your home.

How Plumbing Services Can Save You Time, Money, and Frustration

Plumbing services offer a wide range of solutions to tackle even the most stubborn problems. Whether your issue is a leaky faucet, clogged drain, or water heater malfunction, these professionals have the tools and know-how to resolve it quickly and efficiently.

Plumbing

Plumbing maintenance also helps improve your home’s water efficiency by reducing its waste. This includes fixing leaks, replacing old fixtures with new ones, and recommending water-saving appliances. Contact Got Flow Plumbing & AC Services for professional help.

Faucets get a lot of use and, therefore, are subject to wear and tear. If they become damaged or worn out, it is important to repair them quickly. A leaky faucet can waste water, causing inflated utility bills. Skilled plumbers can identify the source of the problem and make the necessary repairs to prevent future problems with water flow.

Irregular Water Flow

If you notice that your water pressure isn’t as strong as it usually is, there may be internal damage to the valves or pipes. A professional plumber will inspect the faucet and recommend any needed repairs. Irregular water flow could also be caused by sediment or mineral deposits collecting in the aerator filter. A clean aerator filter can resolve this issue.

Leaks from the Spout

If your faucet is leaking from the spout, it’s likely due to worn-out washers or seals. Replacing these components will solve the problem and stop your sink from leaking. Leaking Around the Base
A leaking base is often due to loose or damaged connectors, which can be fixed by tightening or replacing them.

Dripping Faucet

A constant drip from your faucet can waste gallons of water and add to your utility bill. Even if it’s only a drip or two per minute, this can add up over time and lead to a significant increase in your utility costs. Skilled plumbers can perform a quick and inexpensive faucet repair to fix this problem.

Valves and Cartridges

For a dripping faucet, the most common cause is worn-out O-rings and washers. To resolve the problem, you will need to remove the handle and securing hardware, then disassemble the faucet. Once the cartridge or stem is removed, you can replace the washers and O-rings. After installing the new parts, reassemble the faucet and test it to make sure there are no leaks.

Before you start working on a faucet, turn off the water supply valve under the sink. This will stop the flow of water and reduce the risk of flooding and water damage. It is a good idea to have all your tools and replacement parts ready before you begin. It is also helpful to have a diagram or schematic of the faucet, as this will make it easier to reassemble the components correctly. When reassembling, be careful not to overtighten screws or nuts, as this can damage or bend delicate pieces inside the faucet. Once the faucet is reassembled, turn on the water and test it for leaks. If you find any issues with your faucet, contact a skilled plumber right away to repair it. A leaky faucet can add up to hundreds of dollars in water bills over the course of a year, so it’s important to address it early. Our expert plumbers can quickly and easily repair or replace your faucet to ensure optimal functionality and a safe, steady water flow.

Faucet Replacement

There are a lot of reasons why you might need to have your faucet replaced. Sometimes it’s because your old one is worn out and can’t be repaired anymore, but other times it’s because you want to upgrade to a newer design that will fit in with your kitchen renovation or bathroom remodeling plans. Having a professional plumber install your new faucet can save you time, money, and frustration in the long run.

Leaks around the handle, body, or inside the faucet are a sure sign that it’s time for a replacement. If left unattended, these leaks can rust the water lines, cause water damage to your home, and waste gallons of water every month. A qualified plumbing service will be able to diagnose the problem and repair it quickly and efficiently.

Low water pressure is another common reason for replacing a faucet. This can be caused by sediment and mineral deposits in the aerator (the small screen at the tip of the faucet that controls water flow). Our skilled plumbers will clean out your faucet’s aerator to fix the issue and restore proper water pressure.

Difficulty turning the faucet on and off or hearing squeaking, grinding, or other unusual noises when the water is turned on or off are signs that the internal components of your faucet are wearing out. Replacing these parts will resolve the problems and prevent them from happening again in the future.

Another reason for replacing a faucet is to add convenience features. Many modern faucets come with features like pull out spouts, motion-activated options, and water-saving modes. These can make your kitchen or bathroom more functional and enjoyable to use, while also saving you money on energy costs.

Before installing a new faucet, it’s important to shut off the water supply valve beneath your sink to prevent any accidental flooding. Next, remove any existing water lines that connect to the faucet. You may need to loosen the nut that holds the line in place with a wrench. If your water lines are old and corroded, it’s a good idea to replace them at the same time as your new faucet.

Once all the connections are made and the water is back on, test your faucet by turning on the hot and cold water. If you notice any water spots on the wall or ceiling, there is a leak somewhere in your plumbing system. If you are unsure of the source of the leak, a qualified plumbing service will be able to find it for you and recommend the best course of action.

Changing out a faucet is a relatively easy task for a trained professional, but it’s not something you should try on your own. Turning off the water supply valves can be dangerous if you’re not careful, and if you’re not familiar with plumbing codes, it can lead to significant water damage. Our plumbers are trained to work safely and quickly so you can get your new faucet up and running in no time.

Faucet Installation

Plumbing is essential for our everyday lives, providing fresh water and removing waste. However, plumbing can be complicated and dangerous if not handled properly. That’s why it’s important to work with qualified plumbing professionals when you need plumbing repairs or installations. Plumbing services can help you get your home or business back to normal quickly and safely.

A faucet is an important part of any kitchen or bathroom, used for washing dishes, bathing, and more. But over time, faucets can start to wear out, leading to leaks and other problems. In some cases, a simple repair can solve the issue, but in others, you may need to replace your faucet altogether. Whether you’re installing a new sink in your kitchen or replacing an old faucet in your bathroom, it’s important to know the basics of plumbing. This way, you can make the right decision for your home or business.

There are many different types of faucets available on the market, with a wide range of features and designs to choose from. Some are more complex than others, but all of them require proper installation to work correctly. It’s important to follow the instructions provided by your plumber for the best results.

Some common problems with faucets include low water pressure, leaking, or difficulty turning on or off. These issues can be caused by a variety of factors, including a blockage in the pipes, a broken washer, or a loose screw. If you notice any of these problems with your faucet, it’s important to call a plumber right away.

While it’s possible to install a new faucet yourself, it’s usually a better idea to leave the job to a professional. Not only will this save you money, but it will also ensure that the job is done properly and safely.

Before you start working on a faucet, be sure to turn off the water valves under the sink. You’ll want to keep a bucket or other container nearby to catch any water that might spill during the process. Once the water is turned off, you can begin working on the faucet.

Begin by removing the old faucet handle. Use a basin wrench or adjustable wrench to unscrew the faucet supply lines. Be sure to mark the hot and cold lines so you can reconnect them properly. Use penetrating oil if necessary to loosen stubborn nuts. Once the old lines are removed, connect the new ones to your new faucet. Be sure to tighten the connections securely, and apply plumber’s putty around the base of the spout for a watertight seal.

Once the job is completed, the plumber will test the faucet to ensure that it works properly. If there are any problems, the plumber will fix them before they leave your home or business. Then, you can enjoy your new sink or bathroom without worrying about any future issues.